

AI 文章摘要
一、环境准备
1.1:系统环境设置
[root@localhost ~]# yum install vim lrzsz net-tools ntp wget1.1.1:关闭selinux
#查看selinux状态
[root@localhost ~]# sestatus
#关闭selinux
[root@localhost ~]# setenforce 0
#修改配置文件
[root@localhost ~]# sed -ri 's/SELINUX=enforcing/SELINUX=disable/' /etc/selinux/config
1.1.2:重启系统
[root@localhost ~]# reboot1.1.3:关闭防火墙
# 检查默认防火墙状态, 如果返回not running,可以跳过后面的命令
[root@localhost ~]# firewall-cmd --state

#停止并禁用firewalld:
[root@localhost ~]# systemctl stop firewalld     # 停止firewalld
[root@localhost ~]# systemctl disable firewalld  # 禁用firewall开机启动
1.1.4:时间同步
# 检查机器当前时间和时区是否一致,若相互之间差别大于3s(考虑批量执行时的时差),建议校时。
[root@localhost ~]# yum -y install ntp
[root@localhost ~]# date -R

# 查看和ntp server的时间差异(需要外网访问,如果内网有ntpd服务器,自行替换域名为该服务的地址)
[root@localhost ~]# ntpdate -d cn.pool.ntp.org

#如果输出的最后一行offset大于1s建议校时
#和ntp服务器同步时间
[root@localhost ~]# ntpdate cn.pool.ntp.org
1.2:配置YUM源
1.2.1:获取BASE源
#备份默认源
[root@localhost ~]# mv /etc/yum.repos.d/CentOS-Base.repo /etc/yum.repos.d/CentOS-Base.repo.backup

#获取网络源
[root@localhost ~]# wget -O /etc/yum.repos.d/CentOS-Base.repo http://mirrors.cloud.tencent.com/repo/centos7_base.repo

#更新缓存
[root@localhost ~]# yum clean all
[root@localhost ~]# yum makecache
1.2.2:获取EPEL源
[root@localhost ~]# wget -O /etc/yum.repos.d/epel.repo http://mirrors.cloud.tencent.com/repo/epel-7.repo

#更新缓存
[root@localhost ~]# yum clean all
[root@localhost ~]# yum makecache
二、部署MySQL
- 官网要求MySQL8.0或者MariaDB 10以上的版本
- 我这里直接采用YUM的方式安装MySQL8.0版本
2.1:下载YUM源
[root@wordpress ~]# wget https://dev.mysql.com/get/mysql80-community-release-el7-3.noarch.rpm2.2:安装YUM源
[root@wordpress ~]# rpm -ivh mysql80-community-release-el7-3.noarch.rpm2.3:安装MySQL
- 查看 mysql server
[root@wordpress ~]# yum repolist enabled | grep "mysql.*-community.*"
[root@wordpress ~]# yum repolist all | grep mysql- 安装
[root@wordpress ~]# yum install mysql-community-server2.4:启动MySQL
[root@wordpress ~]# systemctl start mysqld.service
[root@wordpress ~]# systemctl enable mysqld.service
[root@wordpress ~]# systemctl status mysqld.service
2.5:配置MySQL
2.5.1:查看登陆密码
[root@wordpress ~]# cat /var/log/mysqld.log | grep 'password'2.5.2:登陆到数据库
[root@wordpress ~]# mysql -uroot -p- 到这里 MySQL 就安装完成了
2.5.3:重置数据库密码
- 注意:8之前是 validate_password_ 8之后validate_password.
密码验证策略低要求
mysql> set global validate_password.policy=0; (0或LOW代表低级)

密码至少要包含的小写字母个数和大写字母个数
mysql> set global validate_password.mixed_case_count=0;

密码至少要包含的数字个数。
mysql> set global validate_password.number_count=0;

密码至少要包含的特殊字符数
mysql> set global validate_password.special_char_count=0;

密码长度
mysql> set global validate_password.length=4;  #8.0最小长度为4

再次设置密码
mysql> ALTER USER 'root'@'localhost' IDENTIFIED BY 'dqz123';
mysql> flush privileges;
2.6:创建用户
2.6.1:创建数据库
mysql> CREATE DATABASE `chevereto` CHARACTER SET utf8mb4 COLLATE utf8mb4_general_ci;- 字符集永久生效
[root@wordpress ~]# vim /etc/my.cnf
character-set-server=utf8mb4
2.6.2:创建用户
mysql> create user chevereto@localhost identified with mysql_native_password by 'dqz123';2.6.3:设置权限
mysql> grant all privileges on chevereto.* to chevereto@localhost;
mysql> flush privileges;
2.6.4:登入测试
[root@wordpress ~]# mysql -uchevereto -p
Enter password:
三、部署nginx
- 这里我采用RPM包安装稳定版nginx
3.1:安装
[root@wordpress ~]# wget http://nginx.org/packages/centos/7/x86_64/RPMS/nginx-1.16.1-1.el7.ngx.x86_64.rpm

[root@wordpress ~]# rpm -ivh nginx-1.16.1-1.el7.ngx.x86_64.rpm

[root@wordpress ~]# nginx -v
nginx version: nginx/1.16.1
3.2:启动
- 我这里本身服务器已经有wordpress程序使用了默认nginx配置文件,那么我在这里重新创建一个chevereto.conf文件,并进行配置
- 创建文件并做一些性能优化
[root@wordpress ~]# vim /etc/nginx/nginx.conf
worker_processes  2;			//根据主机CPU核心进行配置,不得高于主机核数
worker_cpu_affinity auto;
worker_rlimit_nofile 65535;- 创建chevereto配置并配置代码存储位置
[root@wordpress ~]# vim /etc/nginx/conf.d/chevereto.conf
server {
    listen       80;			#监听端口和wordpress一样
server_name  cdn.xxxx.com;	#这里写DNS解析好的域名
    root    /var/www/chevereto;	#代码文件存储根目录,需创建
    location / {
         index  index.php;
         try_files $uri $uri/ /index.php?$query_string;
}
#以上的参数是官方给出的

    location ~ \.php$ {	#这个必须有,不然访问域名则直接下载文件
        fastcgi_pass   127.0.0.1:9000;
        fastcgi_index  index.php;
        fastcgi_param  SCRIPT_FILENAME  $document_root$fastcgi_script_name;
        include        fastcgi_params;
    }
}- 启动前检查配置文件
[root@wordpress ~]# nginx -t
nginx: the configuration file /etc/nginx/nginx.conf syntax is ok
nginx: configuration file /etc/nginx/nginx.conf test is successful- 启动
[root@wordpress ~]# systemctl start nginx
[root@wordpress ~]# systemctl enable nginx
[root@wordpress ~]# systemctl status nginx
四、部署PHP
- 官网要求PHP版本为7以上,新版免费版还不支持php73版本
- 这里我采用YUM安装PHP72版本
4.1:安装
[root@wordpress ~]# yum -y install epel-release

[root@wordpress ~]# rpm -Uvh https://mirror.webtatic.com/yum/el7/webtatic-release.rpm

[root@wordpress ~]# yum search php

[root@wordpress ~]# yum install php72w-fpm php72w-opcache php72w-mysql- 问题处理:解决安装php需要Requires: libargon2.so.0()(64bit)的问题
[root@wordpress ~]# rpm -Uvh http://download-ib01.fedoraproject.org/pub/epel/7/x86_64/Packages/l/libargon2-20161029-3.el7.x86_64.rpm

[root@wordpress ~]# yum install libargon2- 如果你运行的是nginx而不是apache,修改
[root@wordpress ~]# vim /etc/php-fpm.d/www.conf
user = apache
group = apache

#更改为nginx用户和组
user = nginx
group = nginx- 赋权,不然提示如下报错
- G\: Sessions are not working on this server (session_start).
[root@wordpress ~]# chown -R nginx. /var/lib/php/4.2:启动
[root@wordpress ~]# systemctl start php-fpm
[root@wordpress ~]# systemctl enable php-fpm
五、部署chevereto
5.1:下载安装文件
- 官网地址:https://chevereto.com/
- Github地址:https://github.com/Chevereto/Chevereto-Free/releases
- 然后传到服务器网站根目录,记得一定要给Nginx服务启动用户权限
[root@wordpress ~]# cd /var/www/chevereto/
[root@wordpress ~]# wget https://github.com/Chevereto/Chevereto-Free/archive/1.1.4.tar.gz
[root@wordpress chevereto]# tar -xf 1.1.4.tar.gz
[root@wordpress chevereto]# mv Chevereto-Free-1.1.4/* ./
[root@wordpress chevereto]# rm -rf Chevereto-Free-1.1.0 1.1.4.tar.gz
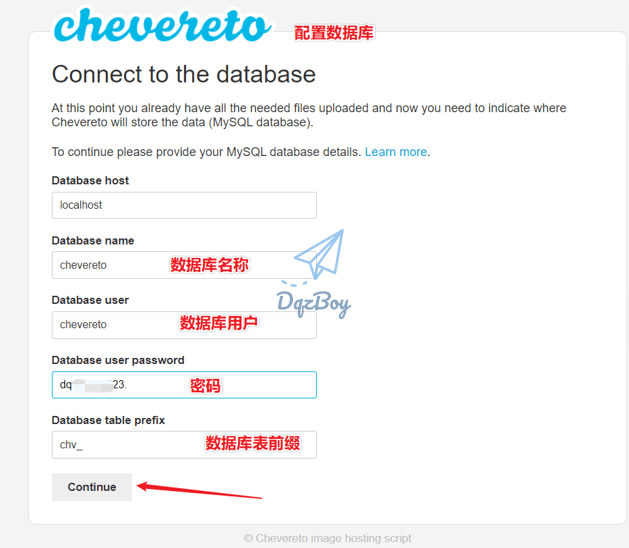
[root@wordpress chevereto]# chown -R nginx. *5.2:浏览器访问
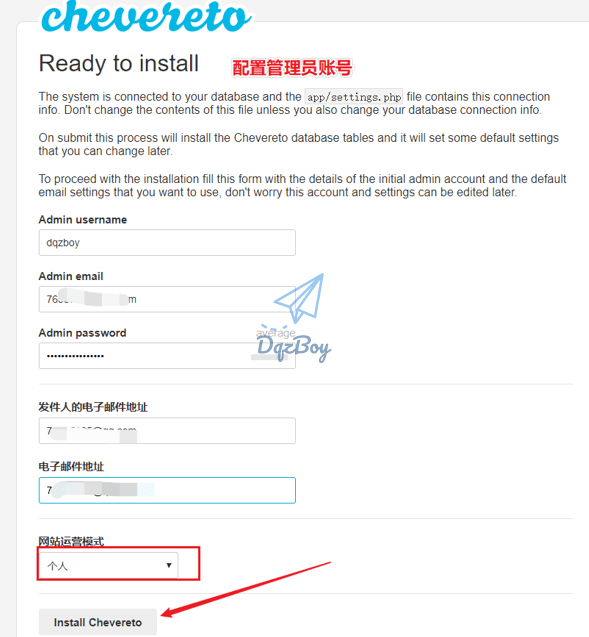
- 通过浏览器访问Nginx配置的域名;可直接进行安装


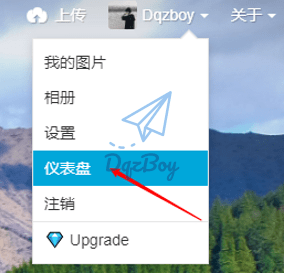


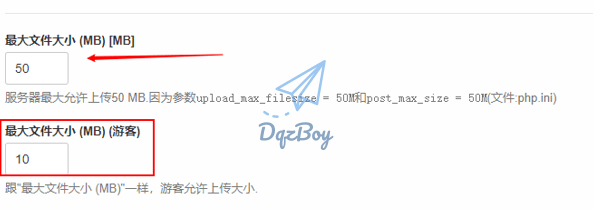
搭建成功,谢谢博主